Data processing
Data manipulation
There is a few different utilities to manipulate data:
dcase_util.data.Normalizer, calculating normalization factors and normalizing data.dcase_util.data.RepositoryNormalizer, normalizing data repositories at once.dcase_util.data.Aggregator, aggregating data inside sliding processing window.dcase_util.data.Sequencer, sequencing data matrices.dcase_util.data.Stacker, stacking data matrices based on given vector recipe.dcase_util.data.Selector, selecting data segments of data based on events with onset and offset.dcase_util.data.Masker, masking data segments of data based on events with onset and offset.
Normalization
dcase_util.data.Normalizer class can be used for calculating normalization factors (mean and standard deviation) for the data without reading all the data in at once. Intermediate statistics are accumulated while reading data in in small portions.
Calculating normalization factors file-by-file:
data = dcase_util.utils.Example.feature_container()

# Initialize normalizer
normalizer = dcase_util.data.Normalizer()

# Accumulate -- feed data per file in
normalizer.accumulate(data=data)

# After accumulation calculate normalization factors (mean + std)
normalizer.finalize()

# Save
normalizer.save(filename='norm_factors.cpickle')

# Load
normalizer = dcase_util.data.Normalizer().load(filename='norm_factors.cpickle')
Using with statement:
data = dcase_util.utils.Example.feature_container()

# Accumulate
with dcase_util.data.Normalizer() as normalizer:
    normalizer.accumulate(data=data)

# Save
normalizer.save(filename='norm_factors.cpickle')
Initializing normalizer with pre-calculated values:
data = dcase_util.utils.Example.feature_container()
normalizer = dcase_util.data.Normalizer(
    **data.stats
)
Normalize data:
data = dcase_util.utils.Example.feature_container()
normalizer = dcase_util.data.Normalizer().load(filename='norm_factors.cpickle')
normalizer.normalize(data)
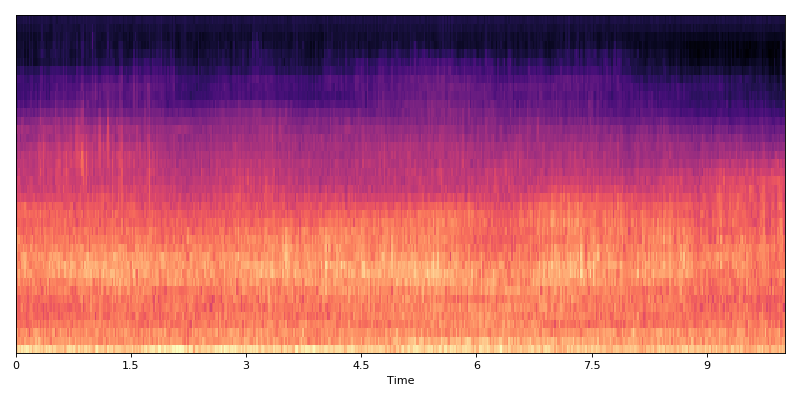
Original data
(Source code, png, hires.png, pdf)

Normalized data
(Source code, png, hires.png, pdf)

Aggregation
Data aggregator class (dcase_util.data.Aggregator) can be used to process data matrix in a sliding processing window.
This processing stage can be used to collapse data with certain window lengths by
calculating mean and std of them, or flatten the matrix into single vector.
Supported processing methods:
flattenmeanstdcovkurtosisskew
All of these processing methods can combined.
Calculating mean and standard deviation in 10 frame window, with 1 frame hop:
data = dcase_util.utils.Example.feature_container()
print(data.shape)
# (40, 501)

data_aggregator = dcase_util.data.Aggregator(
    recipe=['mean', 'std'],
    win_length_frames=10,
    hop_length_frames=1,
)
data = data_aggregator.aggregate(data)
print(data.shape)
# (80, 501)
Original data
(Source code, png, hires.png, pdf)
Aggregated data
(Source code, png, hires.png, pdf)

Flattening data matrix with 10 frames into one single vector, with 1 frame hop:
data = dcase_util.utils.Example.feature_container()
print(data.shape)
# (40, 501)

data_aggregator = dcase_util.data.Aggregator(
    recipe=['flatten'],
    win_length_frames=10,
    hop_length_frames=1,
)
data_aggregator.aggregate(data)
print(data.shape)
# (400, 501)
Original data
(Source code, png, hires.png, pdf)

Aggregated data
(Source code, png, hires.png, pdf)

Sequencing
Sequencer class (dcase_util.data.Sequencer) processes data matrices into sequences (images).
Sequences can overlap, and sequencing grid can be altered between calls (shifted).
Creating sequence:
data = dcase_util.utils.Example.feature_container()
print(data.shape)
# (40, 501)
data_sequencer = dcase_util.data.Sequencer(
    sequence_length=10,
    hop_length=100
)
sequenced_data = data_sequencer.sequence(data)
print(sequenced_data.shape)
# (40, 10, 5)

sequenced_data.show()
# DataMatrix3DContainer :: Class
#   Data
#     data                            : matrix (40,10,5)
#     Dimensions
#       time_axis                     : 1
#     Timing information
#       time_resolution               : None
#   Meta
#     stats                           : Calculated
#     metadata                        : -
#     processing_chain                : -
#   Duration
#     Frames                          : 10
#   Data
#     Dimensions
#       time_axis                     : 1
#       data_axis                     : 0
#       sequence_axis                 : 2
Original data
(Source code, png, hires.png, pdf)

Sequenced data
(Source code, png, hires.png, pdf)
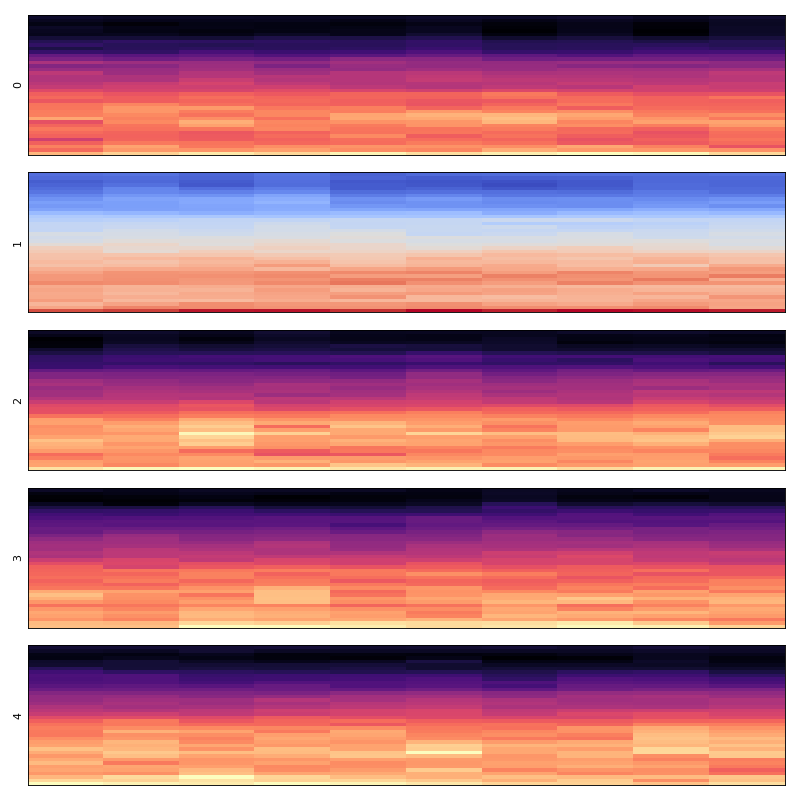
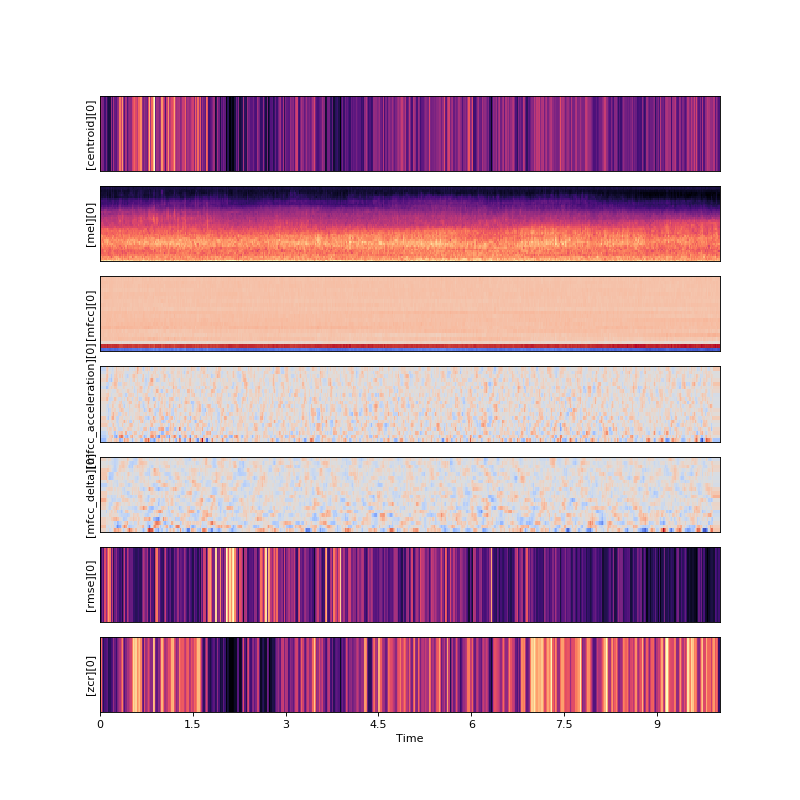
Stacking
Stacker class (dcase_util.data.Stacker) stacks the data stored in the data repository based on recipe. This class can be used, for example, to create a new feature matrix containing data extracted with multiple feature extractors. With a recipe one can either select full matrix, only part of data vectors with start and end index, or select individual data rows.
Example:
# Load data repository
repo = dcase_util.utils.Example.feature_repository()

# Show labels in the repository
print(repo.labels)

# Select full matrix from 'mel' and with default stream (0) (40 mel bands).
data = dcase_util.data.Stacker(recipe='mel').stack(repo)
print(data.shape)
# (40, 501)

# Select full matrix from 'mel' and define stream 0 (40 mel bands).
data = dcase_util.data.Stacker(recipe='mel=0').stack(repo)
print(data.shape)
# (40, 501)

# Select full matrix from 'mel' and 'mfcc' with default stream (0) (40 mel bands + 20 mfccs).
data = dcase_util.data.Stacker(recipe='mel;mfcc').stack(repo)
print(data.shape)
# (60, 501)

# Select data from 'mfcc' matrix with default stream (0), and omit first coefficient (19 mfccs).
data = dcase_util.data.Stacker(recipe='mfcc=1-19').stack(repo)
print(data.shape)
# (19, 501)

# Select data from 'mfcc' matrix with default stream (0), select coefficients 1,5,7 (3 mfccs).
data = dcase_util.data.Stacker(recipe='mfcc=1,5,7').stack(repo)
print(data.shape)
# (3, 501)
Original data
(Source code, png, hires.png, pdf)
Stacked data
Selecting 1st, 5th, and 7th row from the MFCC feature matrix.
(Source code, png, hires.png, pdf)
Data encoding
Data encoders can be used to convert reference metadata into binary matrices.
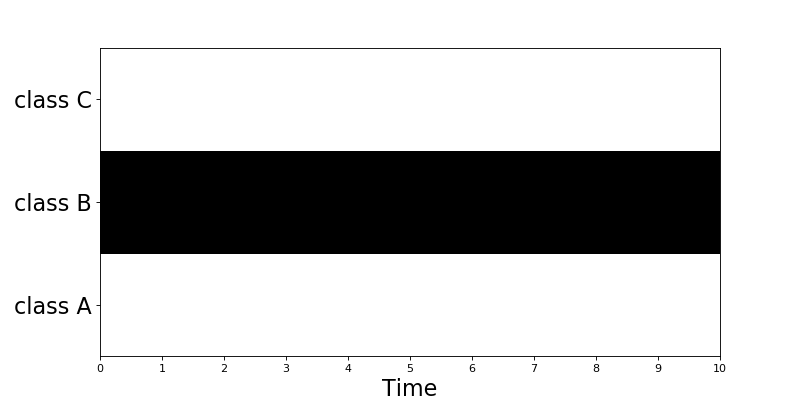
One-hot
OneHotEncoder class (dcase_util.data.OneHotEncoder) can used to create binary matrix where single class is active
throughout the signal. This encoder is suitable for multi-class single-label classification applications.
Example:
# Initilize encoder
onehot_encoder = dcase_util.data.OneHotEncoder(
    label_list=['class A','class B','class C'],
    time_resolution=0.02
)

# Encode
binary_matrix = onehot_encoder.encode(
    label='class B',
    length_seconds=10.0
)

# Visualize
binary_matrix.plot()
(Source code, png, hires.png, pdf)
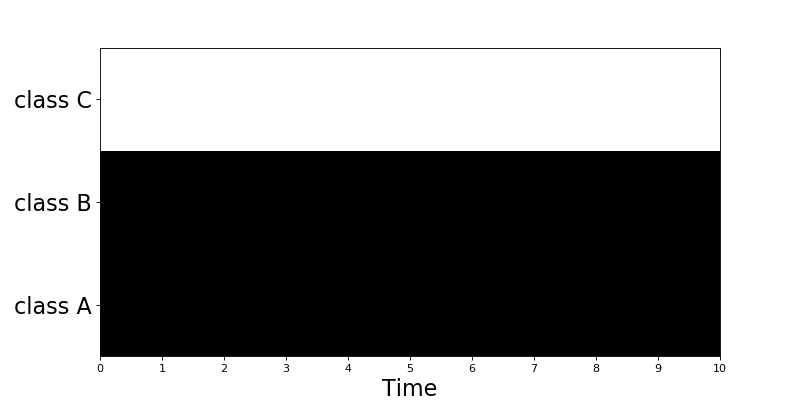
Many-hot
ManyHotEncoder class (dcase_util.data.ManyHotEncoder) can used to create binary matrix where multiple classes are active
throughout the signal. This encoder is suitable for multi-class multi-label classification applications such as audio tagging.
Example:
# Initilize encoder
manyhot_encoder = dcase_util.data.ManyHotEncoder(
    label_list=['class A','class B','class C'],
    time_resolution=0.02
)

# Encode
binary_matrix = manyhot_encoder.encode(
    label_list=['class A', 'class B'],
    length_seconds=10.0
)

# Visualize
binary_matrix.plot()
(Source code, png, hires.png, pdf)
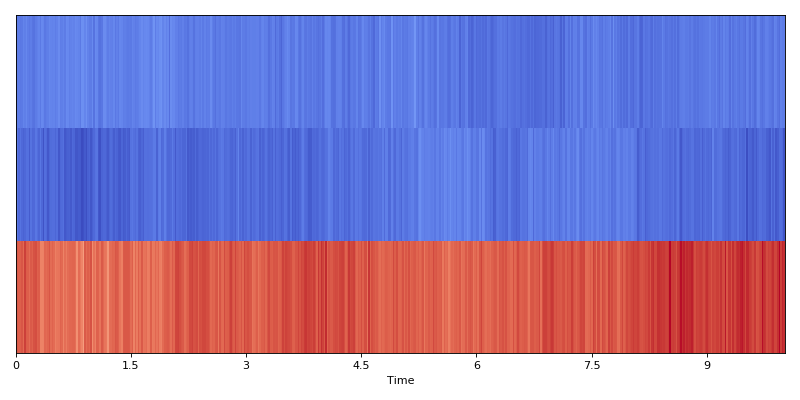
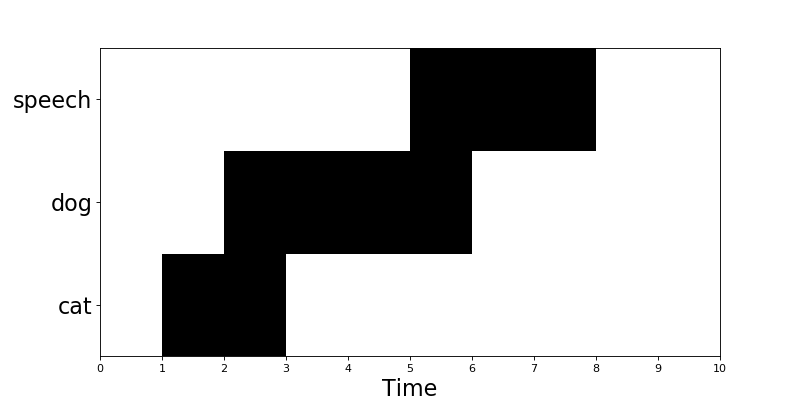
Event roll
EventRollEncoder class (dcase_util.data.EventRollEncoder) can used to create binary matrix where multiple events are active
within specified time segments. This encoder is suitable for event detection applications.
Example:
# Metadata
meta = dcase_util.containers.MetaDataContainer([
    {
        'filename': 'test1.wav',
        'event_label': 'cat',
        'onset': 1.0,
        'offset': 3.0
    },
    {
        'filename': 'test1.wav',
        'event_label': 'dog',
        'onset': 2.0,
        'offset': 6.0
    },
    {
        'filename': 'test1.wav',
        'event_label': 'speech',
        'onset': 5.0,
        'offset': 8.0
    },
])

# Initilize encoder
event_roll_encoder = dcase_util.data.EventRollEncoder(
    label_list=meta.unique_event_labels,
    time_resolution=0.02
)

# Encode
event_roll = event_roll_encoder.encode(
    metadata_container=meta,
    length_seconds=10.0
)

# Visualize
event_roll.plot()
(Source code, png, hires.png, pdf)
Probability encoding
ProbabilityEncoder class (dcase_util.data.ProbabilityEncoder) can used to process 2D data matrix (class, time) with probabilities.
Collapsing matrix over time axis to vector with per class values:
p = dcase_util.data.ProbabilityEncoder()

probabilities = numpy.array(
    [
        [0.2, 0.3, 0.1],
        [0.4, 0.6, 0.7]
    ]
)

out = p.collapse_probabilities(
    probabilities=probabilities,
    time_axis=1,
    operator='prod'
)
print(out)
# [0.006 0.168]
Collapsing data in the matrix with sliding window over time axis:
probabilities = numpy.array(
    [
        [0.1, 0.1, 0.1],
        [0.2, 0.2, 0.2],
        [0.1, 0.3, 0.3],
        [0.1, 0.1, 0.1],
    ]
)
out = p.collapse_probabilities_windowed(
    probabilities=probabilities,
    window_length=2,
    time_axis=1
)
print(out)
# [[0.2 0.1 0.1]
#  [0.4 0.2 0.2]
#  [0.4 0.3 0.3]
#  [0.2 0.1 0.1]]
Binarizing probabilities in the matrix with global threshold:
probabilities = numpy.array(
    [
        [0.1, 0.5, 0.1],
        [0.2, 0.2, 0.2],
        [0.1, 0.6, 0.7],
        [0.1, 0.6, 0.6],
    ]
)
out = p.binarization(
    probabilities=probabilities,
    binarization_type='global_threshold',
    threshold=0.5,
    time_axis=1
)
print(out)
# [[0 1 0]
#  [0 0 0]
#  [0 1 1]
#  [0 1 1]]
Binarizing probabilities in the matrix with class wise thresholds:
probabilities = numpy.array(
    [
        [0.1, 0.5, 0.1],
        [0.2, 0.2, 0.2],
        [0.1, 0.6, 0.7],
        [0.1, 0.6, 0.6],
    ]
)
out = p.binarization(
    probabilities=probabilities,
    binarization_type='class_threshold',
    threshold=[0.5, 0.2, 0.1, 0.4],
    time_axis=1
)
print(out)
# [[0 1 0]
#  [1 1 1]
#  [1 1 1]
#  [0 1 1]]
Binarizing probabilities in the matrix with frame wise max:
probabilities = numpy.array(
    [
        [0.1, 0.5, 0.1],
        [0.2, 0.2, 0.2],
        [0.1, 0.6, 0.7],
        [0.1, 0.6, 0.6],
    ]
)
out = p.binarization(
    probabilities=probabilities,
    binarization_type='frame_max',
    time_axis=1
)
print(out)
# [[0 0 0]
#  [1 0 0]
#  [0 1 1]
#  [0 1 0]]
Decision encoding
DecisionEncoder class (dcase_util.data.DecisionEncoder) can used to process binary 2D data matrix (class, time)
with frame wise activity.
Majority vote:
d = dcase_util.data.DecisionEncoder(label_list=['A', 'B', 'C'])

activity_matrix = numpy.array([
    [0, 0, 0, 1, 1, 0],
    [0, 1, 1, 0, 0, 1],
    [1, 0, 0, 1, 0, 0]
])

out = d.majority_vote(
    frame_decisions=activity_matrix,
    time_axis=1
)
print(out)
# B
Many hot encoding:
d = dcase_util.data.DecisionEncoder(label_list=['A', 'B', 'C'])
activity_matrix = numpy.array([
    [1, 0, 0, 1, 1, 0],
    [0, 1, 1, 0, 0, 1],
    [1, 0, 0, 1, 1, 0]
])

out = d.many_hot(
    frame_decisions=activity_matrix,
    time_axis=1
)
print(out)
# [['A', 'C'], ['B'], ['B'], ['A', 'C'], ['A', 'C'], ['B']]
Translating activity array into start and end index pairs:
activity_array = numpy.array([1, 1, 1, 0, 0, 1, 1, 0, 1])
d = dcase_util.data.DecisionEncoder()
out = d.find_contiguous_regions(
    activity_array=activity_array
)
print(out)
# [[0 3]
#  [5 7]
#  [8 9]]
Filter activity matrix with median filter:
activity_matrix = numpy.array([
    [0, 0, 0, 1, 1, 0],
    [0, 1, 1, 0, 1, 1],
    [1, 0, 0, 1, 0, 0]
])
d = dcase_util.data.DecisionEncoder()
out = d.process_activity(
    activity_matrix=activity_matrix,
    window_length=3,
    time_axis=1
)
print(out)
# [[0 0 0 1 1 0]
#  [0 1 1 1 1 1]
#  [0 0 0 0 0 0]]